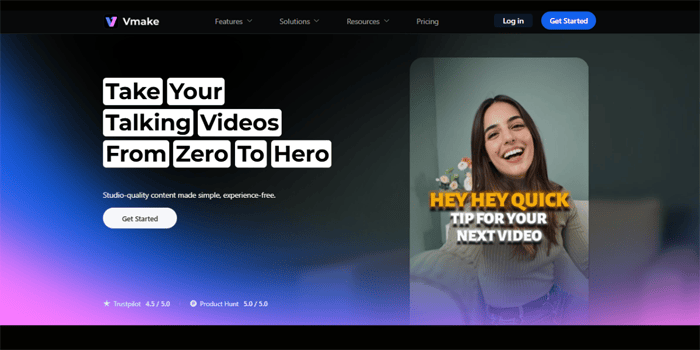
Creating video content used to require a camera, a script, decent lighting, a capable editor, and usually a few hours of your day. Most small businesses don’t have that. Most solo creators don’t either.
That’s exactly the problem Vmake Video generator is built to solve. I spent time testing it across different content types — UGC ads, product videos, and social media content — and this review covers what actually works, what doesn’t, and who gets the most value out of it.
Table of Contents
What Is Vmake Video Generator?
Vmake Video generator is an AI powered tool designed for quick video creation. It focuses on short form content, especially UGC style videos used in ads and social media.
It supports three creation modes: Text to Video lets you turn an idea into a full clip. Image to Video brings product photos or static images to life. Video to Video helps improve or edit clips you already have.
The focus stays on getting results quickly. Instead of spending hours editing, you get a structured video in a few steps.
The following are the main key features that are included in Vmake:
- Multiple AI generation models: You can choose from KLING 2.0, KLING 1.6, Seedance, VIDU, Wan 2.1, MiracleVision 6, and MiracleVision 5. Each model gives a different look and motion style. Some focus on detail, others on smoother movement. You can test and pick what fits your content.
- Flexible video length: Videos can be between 1 and 15 seconds. This range works well for ads and short clips. It gives enough time for a hook and a clear message.
- Visual style variety: You can switch between different styles. Options include Japanese manga, American comics, and Chinese aesthetics. Cinematic and realistic styles work best for branded content.
- UGC Agent: You can add product photos, links, or simple ideas. The system builds a full UGC-style video. It includes structure, hooks, and captions.
- AI Hook Generator: It creates opening lines based on your product. These hooks are short and direct. They help grab attention quickly.
- Auto Captions: Subtitles are generated in one click. They are styled automatically. Paid plans offer more template options.
- Video watermark remover: It removes logos and unwanted text. It helps clean AI-generated or reused clips. This makes videos ready for publishing.
- All-in-one editing tools: You can remove backgrounds and reduce noise. Video quality can also be improved in the same place. Everything stays in one workflow, so editing feels faster.
Feature Summary Table
| Feature | Free | Plus | Pro |
|---|---|---|---|
| Daily Credits | 20/day | 1,000/month | 4,500/month |
| AI Generation Models | Limited | Includes Sora 2, Veo 3.1 | Full access including Seedance Pro, Kling 2.6 |
| Video Export Quality | 1080p with watermark | 1080p | 2K and 4K |
| Auto Captions | Limited styles | All styles + custom templates | All styles + custom templates |
| Commercial Use | No | Yes | Yes |
| Watermark Remover | No | Yes, 10 files/day | Yes, 50 files/day |
| Video Enhancer | No | Yes, 10 files/day | Yes, 50 files/day |
How to Generate Videos with Vmake: Step-by-Step
The whole process feels simple and easy to follow. Here is how it works from start to finish.
Step 1: Create Your Account
Get to Vmake Video generator and sign up for a free account. You do not need a credit card. The free plan gives you 20 credits each day. That is enough to try different video types and test the platform.
Once you log in, you will see the main workspace. The layout is clean. Tools are placed on the left side. The main editing area sits in the center.
Step 2: Choose Your Creation Mode
First, select AI Video Generator from the tools menu. Afterwards, you have three options to provide your input:
- Text-to-Video: type a prompt describing the scene or content you want
- Image-to-Video: upload a product image or photo and animate it
- Video-to-Video: upload an existing clip and apply a new style or enhancement
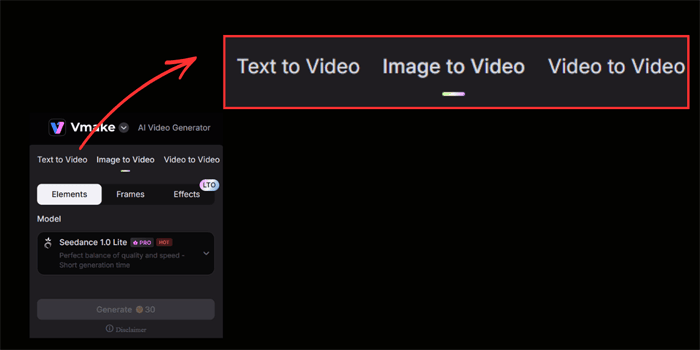
If you are planning to produce UGC ads, Image-to-Video is fantastic for the product-focused content. Contrarily, Text-to-Video goes well with less tangible scenes, backgrounds, or conceptual clips. If you already have the footage and aim to recycle it, Video-to-Video is the fastest way.
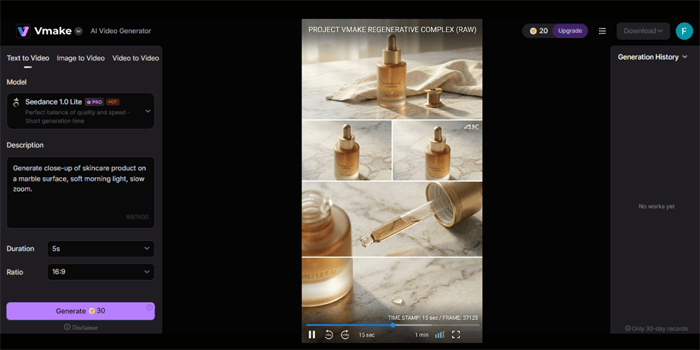
Step 3: Customize the Output
This is where you customize the output. You have options to customize Models, Effects, Duration, Ratios, AI Scenarios and Styles.
Pick from the available Generation Models. KLING and Seedance tend to produce the most natural motion for product and lifestyle content. MiracleVision works well for stylized or creative content.
Then, choose your Visual Style. For e-commerce and social media ads, Cinematic or Realistic styles produce the most professional-looking output. For branded or creative campaigns, the stylized options likeSimulife or Idol give you something more distinctive.
Next comes the Effect selection. Effects completely change how your product looks on screen, and add a bit of the product’s personality to the video – which can really make it stand out. Here are some common ones to check out:
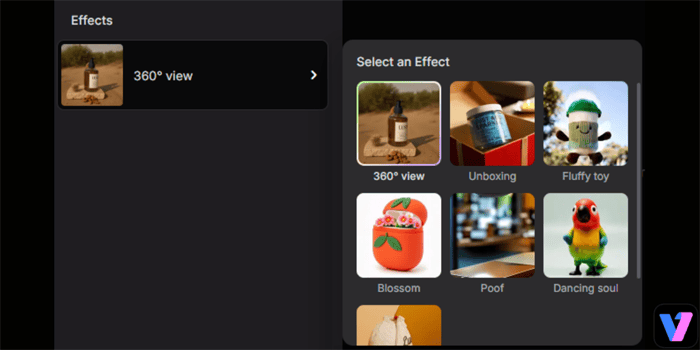
- 360° View: The camera spins around the product from all angles, which can be great for things like skincare, or packaged goods. It gives a proper view of the product from every side.
- Unboxing: It recreates the feeling of opening a product. This format performs well on short video platforms.
- Fluffy Toy: The product gets a soft, playful look. Good fit for gifts or lifestyle items.
- Blossom: Adds a natural blooming effect around the product. Works nicely for beauty and wellness products.
- Poof: A quick appearance effect. Useful for fast hooks and short ads.
- Dancing Soul: Adds motion and energy. The product feels more lively and animated.
You will also see AI scenarios. These help the system understand what kind of video you want to create. It could be a product close up, a lifestyle setting, or a talking style clip. Choosing the right scenario keeps the output focused and relevant.
Step 4: Enter Your Prompt or Upload Your Asset
For Text to Video, write a short and clear prompt. Try to describe the scene, lighting, and movement. A detailed line like “close up of a skincare product on a marble surface with soft morning light and slow zoom” gives better results than a simple phrase.
For Image-to-Video, upload your product photo directly. Vmake reads the image and generates motion around it — panning, zooming, floating effects depending on the model selected.
Step 5: Generate and Preview
Hit ‘Create’ and let the tool do its magic. It’ll probably take around 30 seconds to a few minutes to go through the processing, but once it’s done – you can have a look right there in the workspace. No need to start over if it doesn’t quite look right. You can start tweaking the settings, try a different style and see how it looks.
Step 6: Enhance, Caption, and Export
After you get a version you like, you can refine it a bit more. Use the video enhancer if the video needs better clarity. Add captions if there is voice or dialogue.
If your clip comes from another source and has a watermark, you can clean it with vmake’s video watermark remover before exporting using the built in tool.
When you’re all set, export the video. Paid plans let you go up to 1080p or 4K – just check which plan you’re on and what the options are. Plus, you get to use commercial videos if you need to run ads.
Who Should Use Vmake Video Generator
Small Businesses and E-commerce Brands
Small businesses can get a lot out of this tool. It helps them create UGC style videos regularly without hiring a team or agency. For product based brands, this speed matters. You can turn a simple product photo into a finished video ad in minutes.
It also makes testing easier. You can try different hooks, angles, and styles without spending too much time or money.
Freelancers and Content Creators
Solo creators who post daily across multiple platforms need volume without burnout. Vmake’s generation tools handle the heavy lifting on the visual side, freeing up time to focus on strategy and distribution. The AI Hook generator alone saves significant scripting time.
Social Media Managers
Managing multiple brand accounts means producing a lot of content on short timelines. Vmake fits cleanly into that workflow — generate base content, add captions, clean up watermarks, and export in platform-ready formats all from the same workspace.
Marketing Agencies
For agencies scaling video output across multiple clients, Vmake reduces production time and complexity significantly, enabling teams with limited budgets to produce more content at higher frequency. The Pro plan’s credit volume and 4K export make it viable for client-facing deliverables.
What Works Well
The image-to-video mode is seriously impressive when it comes to creating product content – a decent product photo can be turned into a really smooth animated clip in no time – usually under two minutes. And one of the best things about it is the workspace itself – everything you need to get the job done is all in one place.
You can generate, enhance, caption, remove watermarks and even export your work without having to leave the platform. Plus – the free tier is actually usable – you get a decent 20 credits a day, which is more than enough to give the tool a good go before you decide to upgrade.
What Could Be Better
The Text-to-Video output quality is heavily dependent on how well you phrase your prompt. Use vague language and you’ll end up with generic, uninspired results – you might need to do a little trial-and-error to get the hang of crafting a prompt that produces the kind of output you need.
As for very long-form video (anything over 15 seconds or so) – unfortunately the generator doesn’t support it. That makes it a bit of a challenge if you’re trying to put together a full product demo or ad that’s a bit longer than that. You’ll need to stitch clips together yourself in the editor.
Final Verdict
The Vmake Video generator delivers on its core promise: lightning-fast, affordable and good looking video content without breaking the bank or setting up a whole production team. For UGC ads, social media content and e-commerce creative, it genuinely takes away the barriers that used to make consistent video publishing a major hassle for smaller teams.
It won’t replace a full video production team for cinematic or long-form content. But for the creator, freelancer, or small business owner who needs to publish five videos a week without a budget to match — it covers everything that matters.
The free tier is a low-risk starting point. Spend 20 minutes inside the workspace and the quality speaks for itself.